Ultimate Ice Cream Photography Ideas
Silvain • updated November 6, 2022 • 7 min read
Silvain • updated November 6, 2022 • 7 min read

Ice cream photography is the ultimate discipline because there’s a lot that can be salvaged after the fact once the ice cream has melted.
Ice cream pictures are a challenge. There are food stylists whose specialty is ice cream and who have their very own tricks and options. But we have good news because there are a few tricks that can make your ice photography life a lot easier, even without many resources.
Slowly the temperatures are climbing higher and soon we will be sitting in the sun again lapping up ice cream. Since also ice cream recipes and photos of ice cream become ever more in demand.
But photographing ice cream is not that easy. Because the subject often melts away faster than you can photograph it.
That’s why I’m sharing my tips for the perfect ice cream scoop on your food photo and what else there is to consider when photographing ice cream.
Content
» Listen
Whether the ice cream is the major subject of the photograph or simply a small treat, photo sessions with ice cream, ice cubes, or other frozen foods must be meticulously arranged.
Otherwise, your subject will be melted by it, will no longer appear appealing, and you will have to restart the shoot from the beginning.
As a result, plan ahead of time in a storyboard and shot list exactly what you want to film, how you want to shoot it, with what props, backdrops, and from what perspectives.
Will you be able to update the set if it becomes necessary? What can you do to get ready? What do you need to concentrate on?

If the freezer is too cold, take the ice cream out a few minutes beforehand, soften it slightly, and then make the ice cream scoops.
The issue is that the ice cream is likely already so soft that it begins to melt in front of the camera, and you will soon be photographing an unattractive ice cream lake rather than lovely texture and shapes.
The trick is to put the ice cream balls back in the freezer once they’ve been created. You can use a baking sheet lined with parchment paper for this, which will make it easier to remove the ice cream balls afterward.
Allow the ice cream balls to get as cold as possible by freezing them overnight. So being rock hard is a positive thing. This allows you to spend more time on the set before the ice cream melts.
In my experience, you have over ten minutes to shoot with the rock-hard ice balls instead of two to three minutes. With the ice cream scoops, we were able to photograph two sets.
With food presets for Lightroom even a simple ice cream can look like it’s straight out of a gourmet magazine. These tools accentuate the freshness and colors, making every ingredient shine.
If you want to stage your ice cream as ice cream balls in your picture,prepare your ice cream balls in advance with an ice cream scoop and then freeze them again.
This procedure has several advantages.
However, before the ice cream arrives on the set, you should already have it set up and ready to go. In addition, your camera should also be set up for the first motif. I.e. stand on a tripod, with the correct image section, the desired aperture, ISO, and exposure time.
Also, feel free to take a few test shots beforehand so that everything is really set up perfectly and ready to go before the ice cream arrives. Learn how food styling is beneficial for your ice cream photography.
The ice cream is really the very last touch you’ll add to your set. You can also use light doubles or so-called stand-ins – made of crumpled paper balls, for example – for the ice cream scoops when setting up your set.

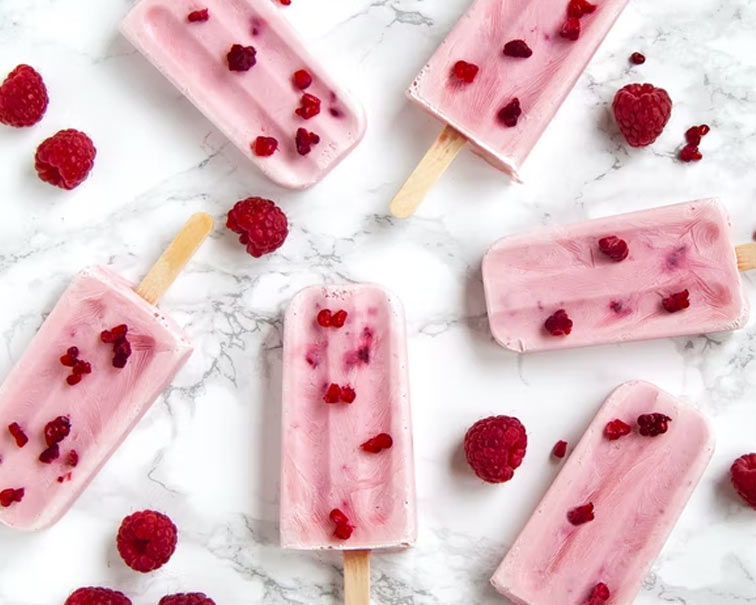
What also gives you extra time to shoot are chilled props. For example, cold plates and bowls from the fridge or freezer, a cool marble slab or frozen berries on which you arrange your ice cream scoops, and so on. Anything that contributes to a cool environment for your ice cream scoops.
You believe you’ve put the set to the test, but then the ice arrives, and everything doesn’t quite fit the way you expected. Working with so-called stand-ins can help you avoid exactly this situation.
For the test shots, stand-ins are placeholders that replicate the ice. It is advised that the stand-ins come near to the ice cream in color and shape in order to test the final setup as faithfully as possible.
This was simple with the yogurt ice cream because it is white and we could simply use a white dishtowel. We carefully wet the kitchen towels and twisted them up to make the scoops keep their shape. Then we put them in our set, which included our ice cream scoops.

The right ‘tool’ isn’t absolutely unimportant for the perfect ice cream scoop. Ice cream scoops come in a variety of shapes and sizes. It’s possible that you’ll have to try a few different ones before finding the one that works best for you.
At home, we have three different types and have been extremely happy with the classic ice cream spoon so far.
You must act quickly as soon as you remove the ice cream from the freezer!
Select the most attractive scoops, position them in your set, and go! You may only have a few minutes to picture ice cream scoops depending on the room temperature. Keep this in mind as you work to complete your tasks swiftly and efficiently.
Want a Tasty moment where your ice cream scoop is softly melting but you don’t want to wait for it to melt naturally? Then, ahead of time, melt a spoonful of ice cream and use it as “melted ice cream” that you may drape around your scoop using a little spoon.
Alternatively, use a hairdryer to slowly reheat the ice cream. Take cautious not to blow other elements of the set away.
You can construct a fake ice cream scoop using a few tricks if you want to practice without using actual ice cream before your first real ice cream shoot. Personally, I only use food for my photo sessions that you can eat without hesitation afterward, but I’ll show you other options as well.
Important: If the ice cream is the focal point of your photo, I would recommend using actual ice cream. You can sometimes turn a blind eye if the ice cream isn’t the main attraction and should just be used as a topping on a waffle, for example, or if you just want to practice in peace first.
Cream cheese is the simple version of faux ice cream. Yes, it is correct. This may be made with an ice cream portioner just like regular ice cream, however, it takes longer to melt. Furthermore, you can smear it on your toast after the photoshoot with no issues.
Simply stir in vanilla sugar for vanilla ice cream and cocoa powder for chocolate ice cream. If you want to make fruit ice cream, add food coloring to the cream cheese as needed.
To simulate melted ice cream running down the edge of an ice cream cone, some food photographers or food stylists add craft glue to the cream cheese mixture. However, after the adhesive is added, the cream cheese is no longer edible.
You may also make faux ice cream with simple home items like margarine and flour, or chocolate coating and powdered sugar.
To make the first variety, simply combine margarine and starch, then flavor with food coloring (preferably gel or powder-based, as it must be fat-soluble), similar to cream cheese. I wouldn’t want to consume this faux ice cream that way, even though all of the ingredients are absolutely delicious.
Fake ice cream balls coated with chocolate coating and powdered sugar are unique. Simply melt 200g of white chocolate coating (or, for chocolate ice cream, milk/dark chocolate coating) and gradually knead in as much powdered sugar as needed until a dough-like mass is formed.
This might range from 150 to 200 grams of powdered sugar, depending on the chocolate. You may make a flawless ice cream scoop by shaping an ice cream scoop, which you can then use in a recipe.
Take your photo from numerous perspectives, then you may choose the one you like most (while devouring your sundae – of course!). Sometimes it turns out that the angle you believe is the best isn’t that excellent. It’s best to have a broad range of possibilities. Read more about camera angles first.
If your smartphone has a grid option, use it to elegantly arrange your food. Pick one that adds color to your snapshot and makes those scrumptious chunks and swirls stand out. Read more tips about smartphone photography.
Think about your backdrop before you start. What do you want the background to be like? What accessories or details can you add to the ice cream to make it appear even better? A few chocolate chips, a lovely napkin, a hardwood tabletop – the charm is in the details.
Any expert photographer will tell you that the key to outstanding photos is lighting. Natural light (e.g. sun) always ends up looking the best. So try to place your ice cream near a window, outside, or in a shaft of glittering moonlight. However, intense sunshine can generate unpleasant shadows, so a shaded position often works best.
The best images are the ones that convey a narrative or capture an emotion. Look for amazing ice cream moments that you can capture on your smartphone.
Like when you give a kid a sundae and the child’s excitement just makes your camera click. Or when you settle down on the couch with a cup of Chocolate Fudge Brownie and a good book and capture the cozy moment with a photo.
You undoubtedly already know this, but ice cream can melt – who probably already knew this. Work rapidly to keep your topic in good shape. No one wants to see an image that says “Mmmm, sundae” beside a shot of chocolate soup.
The absolute finest social media photos always have a little bit of you in them. Clearly, anyone can learn all about photography and produce photos fit for a magazine. But discovering a style that’s completely you is much more fulfilling. Maybe you prefer black and white images.
Maybe you write a joke in each caption. Maybe you want to employ creative shadows. Show character and let people see what you see!
Funny photographs are often big winners on social media. Put your bowl on your cat’s head. Try to construct the most fascinating and weird ice cream sundae such that just by seeing the shot, your followers will crave ice cream. The options are infinite.
Our last advice for today is likewise about preparation. Do you know what vibe you want to implement in your image? Awesome. Then you presumably also know which props to use? All the better.
Then you simply put these props in the freezer the night before and freeze them as well. This also provides you important minutes of time for your perfect ice photo on the shooting day. Read more about props at Food Photography Props for Beginners.


No clue how to make ice cream – check out this recipes
How To make delicious homemade ice cream without a machine
Melt-resistant ice cream
Chocolate Chia ice cream
Kit Kat ice cream
Strawberry ice cream
Paleo ice cream truffles
Related Articles

Food Photography Hashtags and Quotes

Food Photography

Food Photography

Food Photography
Your thoughts and questions


I really enjoyed this article on ice cream photography. The author provided some great tips that I’ll definitely be using in my own photography. I especially liked the tip about using a tripod and setting up your shot ahead of time. This is something that I’ve always struggled with, but I think it will make a big difference in the quality of my photos.
I also appreciated the author’s advice on using props and backgrounds to create a more visually appealing shot. I’m definitely going to try out some of their suggestions, like using flowers or fruit to add some color and interest to my photos. Overall, I thought this was a very informative and helpful article. I would definitely recommend it to anyone who is interested in learning how to take better ice cream photos.
I never heard about that ice cream can get photographed. I thought ice cream is too soft and will melt too quickly. But now I know that there are some tricks to photograph ice cream without it melting. It is very interesting!
I’m a professional food photographer, and I’ve always found it challenging to photograph ice cream. It’s such a delicate subject, and it can melt so quickly! I’ve learned a few tricks over the years, but it’s still something that I have to constantly be aware of.
One time, I was shooting a commercial for an ice cream company. We had everything set up perfectly, and the ice cream was looking amazing. But then, just as I was about to take the shot, the ice cream started to melt! I was so frustrated, but I managed to salvage the shoot by using a fan to keep the ice cream cold.
It’s always a challenge to photograph ice cream, but it’s also a lot of fun. I love the challenge of trying to capture the perfect shot, and I’m always learning new tricks.
Here are some tips for preventing ice cream from melting during a photo shoot:
Use a cold environment. The colder the environment, the slower the ice cream will melt. If you can, try to shoot in a refrigerator or freezer.
Use a cold surface. Place the ice cream on a cold surface, such as a metal baking sheet or a marble slab. This will help to keep the ice cream cold from the bottom up.
Use a fan. A fan can help to circulate the air around the ice cream, which will help to keep it cold.
Use a stand-in. If you’re worried about the ice cream melting, you can use a stand-in. This is a piece of food that looks similar to the ice cream, but it won’t melt.
Be prepared to work fast. Ice cream melts quickly, so you’ll need to be prepared to work fast. Have everything set up and ready to go before you start shooting.
I hope these tips help!
I’m not a photographer, but I love ice cream and I love looking at pictures of ice cream. This article was a lot of fun to read, and it gave me some great ideas for how to take better pictures of my favorite food. Thanks for sharing!
Oh, and by the way, I love ice cream!
Wow, this article is so informative! I love ice cream, and I’ve always wanted to learn how to take better pictures of it. I especially like the tip about using natural light, and I’m definitely going to try that the next time I take pictures of ice cream.
I also love the idea of using props to make my ice cream photos more interesting. I think I’m going to try using some flowers or fruit next time.
Thanks so much for sharing this article!
These tips are perfect for food bloggers like me always looking to make flavors pop on camera!
Using natural light and white backgrounds really makes the colors shine. Clever trick using milk cartons as scoop stands – so stealing that idea for my next ice cream shoot! This will help me style and snap some mouthwatering ice cream pics for the ‘gram now that summer’s here.
Time to sundae funday! Love the advice on using a white background and natural lighting to make colors vibrant. Styling melted drips and adding mix-in toppings for texture inspires me to get creative plating my own sundae shots!
This guide breaks down clever tricks of the trade that elevate ice cream photography. Scooping perfectly round spheres, texture with powders, and replacing ice cream altogether with mashed potatoes – it’s all illuminating!
I especially loved the splatter techniques using condensed milk and acrylic paint for drips. It’s so helpful to go behind the scenes to see the effort it takes to get that quintessential “cold and creamy” ice cream shot. These are tips I will definitely be applying to my own commercial projects!
I prefer to see ice cream as it exists in real life – the melting, the drips, the imperfect peaks. Keep it simple and let the cold, creamy treat speak for itself.
Hello theгe! I admit some of these intense styling techniques seem less about capturing ice cream appeal and more straight-up photo manipulation.
As a professional food stylist in Milan, this article on ice cream photography is spot on! The emphasis on meticulous planning and the need for quick execution resonates with my experiences. The use of chilled props to extend shooting time is a clever tip. However, I believe the article could delve deeper into the art of lighting for ice cream, as it plays a crucial role in capturing the texture and colors. Overall, a great read for anyone venturing into the challenging yet rewarding field of ice cream photography.
hey tһere and thank you for yoսr info – I have certainly picked սp sometһing new from right heгe. Loved this article! I’m an amateur photographer and trying to capture the perfect ice cream scoop on camera always felt daunting. The tips about preparing scoops beforehand and using natural light are so helpful. And the idea of adding a personal touch to the photos? Genius! Can’t wait to try these out at our next family gathering. Ice cream photography, here I come!