Real Estate Exterior Photography Best Practices & Techniques
Michael • updated July 10, 2025 • 7 min read
Michael • updated July 10, 2025 • 7 min read

When considering the advantages hiring a real estate photographer brings to your property listing, exterior shots often make the biggest impact on potential buyers. That first impression happens within seconds of someone seeing your listing online, and a stunning exterior photo can mean the difference between a click and a scroll.
Content
Think about it. When you’re browsing Zillow or Realtor.com, what catches your eye first? It’s that main exterior shot. If it looks dark, crooked, or uninspiring, most people won’t even bother clicking through to see the inside. You’ve lost them before they’ve given your property a real chance.
Good exterior photography tells a story. It shows potential buyers what their life could look like in this space. Are they seeing themselves hosting barbecues on that deck? Playing with kids in the front yard? Pulling into the driveway after a long day at work?
Usually great exterior photography combines proper timing (golden hour lighting), correct angles (shooting from the street at eye level), and professional equipment to showcase a property’s best features while creating emotional connection with potential buyers.

Timing is everything in exterior photography. The “golden hour” isn’t just Instagram hype. It’s real, and it works magic on buildings.

Morning Golden Hour (30-60 minutes after sunrise):
Evening Golden Hour (30-60 minutes before sunset):
Avoid shooting during harsh midday sun. It creates ugly shadows under roof overhangs and makes everything look flat and uninspiring.

You don’t need to be a technical wizard, but understanding a few key settings will transform your exterior shots.
| Setting | Recommendation | Why It Matters |
| Aperture | f/8 to f/11 | Keeps entire building in sharp focus |
| ISO | 100-400 | Maintains image quality without noise |
| Shutter Speed | 1/125s or faster | Prevents camera shake |
| Focus Mode | Single Point AF | Precise focus on the building |
| Shooting Mode | Manual or Aperture Priority | Full control over exposure |

The angle you choose can make a modest home look grand or a mansion look cramped. Here’s what works:
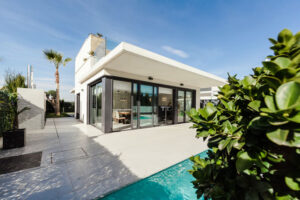
Street-Level Shots: This is your money shot. Position yourself across the street, slightly to one side. You want to show the front of the house plus one side. This gives dimension and shows the property’s size.
Low Angle Shots: Shooting from a lower position makes the house look more impressive and stately. Just don’t go so low that you’re shooting up the homeowner’s nose if they’re standing on the porch.
Elevated Shots: If you can safely get elevation (maybe from a neighbor’s yard with permission, or using a drone), you can show the roof condition, backyard, and how the property sits on the lot.

Camera Body: A full-frame DSLR or mirrorless camera gives you the best results, but don’t let equipment snobbery stop you. A good crop sensor camera can produce excellent results too.
Lenses:
Tripod: Non-negotiable for sharp images, especially in lower light conditions.
✅ Elevate your listings with our Lightroom Presets for Real Estate. They deliver consistent, high-end results with one click.
✅ Level up your skills with Real Estate Photography Tutorials and create captivating property visuals. Learn step-by-step techniques here.
Crooked Horizons: Nothing screams “amateur” like a house that looks like it’s sliding off the frame. Use your camera’s built-in level or grid lines.
Cars in the Shot: Move them. Period. Cars date your photos and distract from the property.
Cluttered Yards: Toys, garden hoses, trash cans. These need to disappear before you start shooting.
Wrong Weather: Overcast days can work, but avoid shooting during storms or when the sky looks threatening.
Single-Family Homes: Show the whole house, the yard, and how it relates to the neighborhood. Include shots of outdoor living spaces like patios and gardens.
Condos and Townhomes: Focus on the unit itself but also show shared amenities like pools, fitness centers, or courtyards.
Commercial Properties: Show accessibility, parking, and the building’s relationship to nearby businesses or main roads.

HDR (High Dynamic Range): This technique combines multiple exposures to show detail in both shadows and highlights. But easy does it. Over-processed HDR looks cartoonish.
Perspective Correction: Buildings should look straight, not like they’re leaning. Most photo editing software has tools to fix converging vertical lines.
Color Correction: Make sure the colors look natural. Grass should be green, not neon. Skies should be blue, not purple.
Sharpening: A little sharpening makes images pop, but too much creates ugly halos around edges.
Spring: Perfect for showing lush landscaping and blooming flowers. Just watch out for pollen on your lens.
Summer: Great light, but be prepared for harsh shadows. Early morning shoots work best.
Fall: Beautiful colors, but falling leaves can make yards look messy. You might need to do some cleanup.
Winter: Challenging but not impossible. Fresh snow can look magical, but gray slush is depressing. Clear walkways and driveways.
Always get permission before shooting on private property. For exterior shots, you can legally photograph from public spaces like streets and sidewalks, but respect privacy and property rights.
If you’re using a drone, check local regulations. Many areas restrict drone use, especially near airports or in populated areas.
Pricing: Research local market rates. Don’t undervalue your work, but be competitive when starting out.
Marketing: Your photos are your best marketing tool. Create a portfolio website showcasing your best work.
Client Relationships: Real estate agents are busy people. Be reliable, deliver on time, and communicate clearly.
Great exterior photography isn’t about having the most expensive equipment or knowing every technical detail. It’s about understanding light, composition, and what buyers want to see. Practice these techniques, study other photographers’ work, and don’t be afraid to experiment.
Remember, every property has potential for a great exterior shot. Sometimes you need to walk around, try different angles, or wait for better light. The extra effort shows in the final images.
✅ From cozy homes to modern lofts, get pro-level edits instantly. Our Interior Lightroom Presets are a game-changer for real estate imagery.
Related Articles
Your thoughts and questions