Understanding Lighting for Better Airbnb Photos
Michael • May 11, 2023 • 8 min read
Michael • May 11, 2023 • 8 min read

Airbnb photos. The metaphorical window through which potential guests peek into your humble abode. First impressions matter, as they say, and your Airbnb listing is no exception.
The importance of high-quality photos for your Airbnb listing cannot be overstated, for they are the hook that lures weary travelers to your doorstep. But what makes a photo truly stand out? The answer, my friend, lies in lighting – the unsung hero of photography.
This article will illuminate (pun intended) the path to understanding lighting for better Airbnb photos. We’ll shed light on the types of lighting, techniques to enhance your photos, and additional tips to help you capture the essence of your space in the most flattering way possible. Let’s embark on this enlightening journey together, shall we?
Content
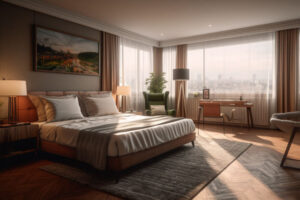
To bask in the glorious rays of natural lighting is to embrace the sun’s gifts. Sunlight, daylight, window light, outdoor lighting, and the magical golden hour – these are the various forms of natural lighting that can elevate your Airbnb photos to celestial heights.
Natural lighting is your friend, and to harness its power, you must know the best times of day to capture it. Morning light, just after sunrise, is like the first sip of coffee, soft and gentle. In contrast, the golden hour – that brief window before sunset – casts a warm, golden glow that breathes life into your photos.
Don’t shy away from overcast days, either. The clouds act as a giant diffuser, softening shadows and creating an even light across your space.
While the sun may be the star of the show, artificial lighting can be a reliable understudy. Interior lighting, lamps, overhead lighting, string lights, and fairy lights all have a role to play in creating captivating Airbnb photos.
Artificial lighting can be manipulated and controlled, allowing you to achieve the desired mood and atmosphere. Mix and match different types of lighting sources to create a cozy ambiance or brighten up a dim corner.
Lighting, the master puppeteer of photography, can create drama and emotion, turning your Airbnb photos into visual poetry. Proper lighting techniques are like the brushstrokes of an artist, painting your space in its best possible light.
Let’s delve deeper into the art of light placement, temperature, and intensity to ensure your photos tell a captivating story.
The importance of proper light placement cannot be emphasized enough. Like the sun and moon orchestrating day and night, light placement can create a delicate dance of shadows and highlights that breathe life into your photos.
To determine the best placement for your Airbnb photos, consider the following:
Remember to play with shadow and highlight to create the perfect balance of contrast and harmony in your Airbnb photos. The lighting is also important for your Airbnb cover photo.
Light temperature refers to the warmth or coolness of a light source, which is measured in degrees Kelvin (K). Like a culinary maestro, adjusting light temperature can transform the ambiance of your photos, making them feel cozy and inviting or crisp and refreshing.
Here’s how to adjust light temperature for your Airbnb photos:
Remember, the goal is to find the perfect balance of warm and cool light that brings out the best in your Airbnb space. We have even more about color, learn about how to use Color Psychology in Your Airbnb Photos.
The intensity of light, or brightness, can make or break your Airbnb photos. It’s the difference between the sweet serenade of a violin and the deafening screech of a vuvuzela.
To adjust light intensity for your Airbnb photos, consider the following:
By skillfully adjusting light intensity, you can create Airbnb photos that are as visually stunning as the aurora borealis dancing across the night sky.
To further refine your mastery of light intensity, consider the following tips:
By mastering the art of light placement, temperature, and intensity, you’ll possess the tools to create Airbnb photos that dazzle and enchant potential guests. Like a skilled magician, you’ll weave a tapestry of light and shadow that showcases your space in its most captivating form.
Remember, the world of lighting is as vast and varied as the cosmos above. Don’t be afraid to venture beyond the familiar and experiment with new techniques and ideas.
With practice and persistence, your Airbnb photos will shine like the brightest stars, beckoning travelers from far and wide to experience the magic of your space. To get a deeper understand, also read about how to light a hotel room.
In the words of the ancient philosopher, “A photo unedited is like a joke untold.” Okay, maybe no philosopher ever said that, but the sentiment remains: editing your photos is crucial. Adobe Lightroom, Adobe Photoshop, and presets can help you fine-tune your Airbnb photos, making them look polished and professional.
Adjust brightness, contrast, and saturation to bring out the best in your photos. Play with shadows and highlights to create depth and dimension. Remember, though – much like a comedian’s punchline, timing is everything. Over-editing can make your photos look unnatural and uninviting.
While you don’t need a Hollywood film crew to capture stunning Airbnb photos, investing in some basic equipment can make a world of difference. A quality camera, tripod, lens, remote shutter, and reflector are just a few essential tools that can elevate your photos from amateur to extraordinary.
A tripod will steady your hand and ensure sharp, crisp images. A remote shutter allows you to take photos without physically touching the camera, preventing any unintentional movement. And a reflector can bounce light onto your subject, softening shadows and creating a more even illumination.
Staging, dear reader, is like setting the stage for a theatrical performance. It’s the art of arranging furniture and décor to create a welcoming and visually appealing environment. While lighting techniques are the stars of the show, staging plays a crucial role in making your Airbnb photos stand out.
You find much more Airbnb experts tips for photos here.
Ah, the age-old debate: to DIY or not to DIY? Hiring a professional photographer can certainly elevate your Airbnb photos to new heights. However, if you’re willing to invest time and effort into learning the tricks of the trade (like the ones discussed in this article), you can create stunning visuals that rival those of the pros. If you are more into DIY, read our guide about how to take Airbnb photos with a smartphone.
Smartphones, those pocket-sized wonders, have come a long way in recent years. While they may not offer the same level of control and versatility as a dedicated camera, they can still capture impressive images. Just remember to harness the power of lighting techniques and follow our tips for the best results.
Photographing your Airbnb is like cooking a soufflé – one misstep and the whole thing can collapse. Common mistakes to avoid include cluttered spaces, poor lighting, unflattering angles, and over-editing. Keep your space tidy, pay attention to lighting, and practice your photography skills for a recipe for success. Read about the impact of bad photos on Airbnb bookings.
Updating your Airbnb photos is like refreshing your wardrobe – it keeps things current and prevents staleness. Consider updating your photos seasonally, after making significant changes to your space, or if you notice a decline in bookings. A fresh set of photos can work wonders in attracting new guests.
As we conclude our enlightening journey, let us recap the main points we’ve covered. We’ve learned the importance of high-quality photos for your Airbnb listing, the types of lighting, techniques to enhance your photos, and additional tips to help you capture the essence of your space in the most flattering way possible.
So, dear reader, go forth and conquer the world of Airbnb photography with newfound knowledge and confidence. Remember to experiment, play with light and shadows, and, most importantly, have fun.
After all, your Airbnb listing is a reflection of your unique space, and what better way to showcase it than through captivating visual content? Happy shooting!
Related Articles
Your thoughts and questions