Hotel Room Photoshoot: How to Create Stunning Hotel Images
Michael • updated July 10, 2025 • 9 min read
Michael • updated July 10, 2025 • 9 min read

A Hotel Room Photoshoot can make or break your property’s online presence, turning potential guests into confirmed bookings with the right visual approach. After shooting hundreds of hotel rooms across different brands and markets,
I’ve learned that great hotel photography isn’t just about having expensive gear. It’s about understanding light, space, and what actually makes people want to book a room.
Content
Equipment needed: Full-frame camera, wide-angle lens (14-24mm), tripod, off-camera flash, reflector, and lens cleaning kit.
Best time to shoot: Early morning (7-10 AM) or late afternoon (3-6 PM) for natural window light.
Key technique: Position camera low and far back, use multiple exposures for windows, and always shoot tethered to a laptop for instant review.
Post-processing: HDR blending, color correction, and subtle sharpening are non-negotiable.

Getting your camera settings right saves hours in post-processing. Here’s what I use for 90% of my hotel room shots:

Before touching your camera, spend 30 minutes prepping the room. This step separates amateur shots from professional results.
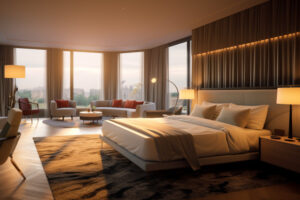
Bed styling: Pull covers tight with hospital corners, fluff pillows symmetrically, and remove any wrinkles with a steamer. The bed occupies 60% of most room photos, so it needs to look perfect.
Lighting setup: Turn on ALL room lights, including bathroom and closet lights. Mix warm and cool light sources for depth. Close curtains halfway to control harsh sunlight.
Detail cleanup: Remove guest amenities, hide cables, empty trash bins, and wipe down all surfaces. Place fresh flowers or a welcome basket for warmth.

The corner shot: Position yourself in the far corner from the bed, shooting diagonally across the room. This creates depth and shows maximum space.
Leading lines: Use the bed frame, window frames, or carpet patterns to draw the eye through the image.
Rule of thirds: Place the bed along the lower third line, never dead center. This creates visual balance.
Foreground elements: Include a chair, ottoman, or decorative item in the foreground to add layers and interest.

Natural light is your best friend, but it needs help. Here’s my lighting workflow:
Pro tip: Use a grey card in your first test shot. This gives you a perfect white balance reference point later.

| Budget Level | Camera | Lens | Tripod | Flash | Total Cost |
| Beginner | Canon EOS R10 | 10-18mm STM | Amazon Basic | Built-in | $800 |
| Professional | Canon 5D Mark IV | 16-35mm f/2.8 | Gitzo Carbon | Profoto A10 | $4,500 |
| Expert | Canon R5 | 15-35mm f/2.8 RF | Gitzo Series 5 | Profoto B10 | $8,000 |

Software: Adobe Lightroom and Photoshop (Capture One works too)
Common mistakes to avoid: Over-saturation, HDR halos, and excessive contrast. Hotel photos should look inviting, not surreal.
👉 Create stunning, inviting spaces in your photos with Lightroom Presets for Interior. Perfect for making your hotel or B&B stand out with warm, balanced edits.

Standard rooms: Focus on the bed and one key amenity. Keep compositions simple and uncluttered.
Suites: Show the separation between spaces. Shoot the living area and bedroom separately, then create a connecting hallway shot.
Bathrooms: Use vertical orientation, include mirrors for depth, and always show the shower/tub area. Natural light from windows is gold here.
Balcony rooms: Shoot from the balcony looking in, and from inside looking out. The view is often the selling point.

Housekeeping: Brief them on your standards before starting. They’re your best allies for quick room resets.
Management: Get a contact person who can override keycard restrictions and approve room changes.
Timing: Schedule shoots during low occupancy periods (Tuesday-Thursday, 10 AM-2 PM typically).

Hotel rooms should feel warm and inviting. Aim for 3200K-3800K color temperature in your final images. This slight warmth makes spaces feel cozy rather than clinical.
Always include: Fresh flowers, books, coffee cups, wine glasses, fruit bowls Never include: Personal items, branded products (unless client-approved), food that can spoil Seasonal: Beach towels for summer, cozy blankets for winter
Connect your camera directly to a laptop using a USB cable. This lets you see images full-size immediately, catch focus problems, and make adjustments on the spot. It’s professional practice that saves time and ensures better results.
Distorted perspectives: Wide-angle lenses can make rooms look weird if not used carefully Poor bed styling: Wrinkled sheets or crooked pillows scream unprofessional Mixed white balance: Warm and cool light sources fighting each other Cluttered compositions: Too many elements competing for attention Over-editing: HDR halos and unnatural colors turn people off

Start with smaller boutique hotels or B&Bs. They’re often more flexible and willing to trade services for marketing images. Build relationships with hotel marketing managers and interior designers who recommend photographers.
Portfolio essentials:
Hotel photography evolves with design trends and guest expectations. Currently, guests want to see:
Great hotel room photography isn’t about having the most expensive gear or the most artistic vision. It’s about understanding what makes people want to book a room and then capturing that feeling in a photograph. Focus on cleanliness, warmth, and space. Make every shot tell a story about the guest experience.
The best hotel photographers don’t just document rooms; they sell dreams. Every image should make viewers imagine themselves relaxing in that space, enjoying their stay, and wanting to return. That’s the real secret to stunning hotel photography.
Improve your property photography with our Tutorials for Hotel photography. Check out our Guides for Hotel photography for professional techniques.
Transform your real estate photos with our Real Estate Lightroom Presets. Discover our Lightroom Presets for Real Estate collection today.
Related Articles
Your thoughts and questions