29 Fries Photography Tips for stunning Fries Images
Silvain • June 26, 2023 • 9 min read
Welcome to the tantalizing world of fries photography, where we unlock the secrets to capturing the mouthwatering appeal of everyone’s favorite snack.
In this comprehensive guide, we delve into the art of fry photography, offering expert tips and techniques to elevate your skills.
From mastering composition and lighting to styling and post-processing, you’ll learn how to create stunning fry images that leave viewers craving a taste.
Get ready to embark on a visual feast as we dive into the delicious realm of fries photography.
Content
1. The Art of Fries Photography
Highlighting the Visual Appeal of Fries
Fries possess a unique visual appeal that makes them perfect subjects for food photography. Their golden, crispy exterior and soft, fluffy interior create a delightful contrast that immediately grabs attention.
The textures and colors of well-cooked fries make them irresistible, making viewers crave a taste. Whether they’re served in a cone, on a platter, or as a side dish, fries bring a sense of comfort and indulgence that resonates with food enthusiasts.
The Importance of Composition, Lighting, and Styling
Composition, lighting, and styling are essential elements in capturing mouthwatering fry shots.
Thoughtful composition can transform a simple plate of fries into a captivating visual story.
Consider the rule of thirds and place the fries strategically within the frame to create balance and interest.
Experiment with different angles and perspectives to add depth and dimension to your photographs.
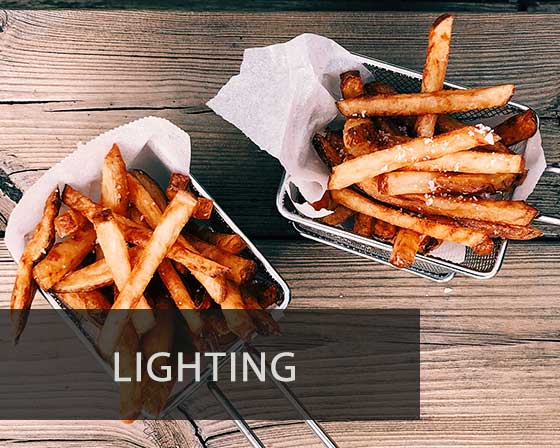
Lighting plays a crucial role in enhancing the appetizing qualities of fries. Natural light, especially during the golden hours of sunrise or sunset, brings out the rich colors and textures.
Position your fries near a window or shoot outdoors to harness the soft, diffused light that flatters the dish. Alternatively, artificial lighting setups can be used to create dramatic effects or highlight specific areas of the composition.
Styling is the art of arranging the fries and accompanying elements to enhance the overall aesthetic. Choose props and backgrounds that complement the fries and evoke a desired mood or theme.
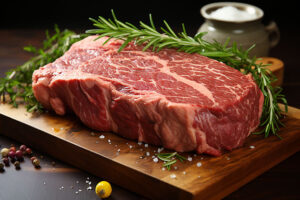
Consider the dishware, napkins, and garnishes that can add visual interest and tell a story. For example, placing the fries on a rustic wooden board with a sprinkle of sea salt can evoke a sense of casual elegance.
Tips for Choosing the Right Props and Backgrounds
When selecting props and backgrounds for fries photography, aim to enhance the appetizing qualities of the dish without overwhelming it. Keep the focus on the fries while adding complementary elements. Here are a few tips:
Opt for neutral backgrounds or surfaces that allow the fries to stand out.
Consider using rustic or textured props to add visual interest and depth.
Experiment with different plates, bowls, or baskets to create a sense of variety.
Use contrasting colors to make the fries pop and create an appealing visual contrast.
Don’t overcrowd the composition; leave enough negative space to let the fries shine.
By paying attention to composition, lighting, and styling, and by carefully selecting props and backgrounds, you can elevate your fries photography to new heights. These elements work in harmony to create mouthwatering images that captivate and entice food enthusiasts.
Turn Food Photos into Masterpieces.A must-have for all Foodies!
To capture stunning fry images, it’s important to have the right photography equipment at your disposal. Here are the essential tools that will help you achieve professional results:
DSLR or Mirrorless Cameras: Investing in a high-quality camera with manual controls is crucial for detailed shots. DSLR and mirrorless cameras offer superior image quality, flexibility, and the ability to adjust settings according to your specific needs. They provide greater control over exposure, focus, and depth of field, allowing you to capture the intricate details of fries with precision.
Lenses: Different lenses serve various purposes in food photography. A prime lens with a wide aperture, such as a 50mm or 85mm lens, can create a shallow depth of field, separating the fries from the background and adding a beautiful bokeh effect. Macro lenses, with their close focusing capabilities, enable you to capture the tiniest details of individual fries, showcasing their texture and crispiness.
Tripods: Stability is key when photographing fries, especially when shooting in low light conditions or using longer exposure times. A sturdy tripod keeps your camera steady, eliminating camera shake and ensuring sharp images. It also allows you to fine-tune your composition and make precise adjustments.
Remote Shutter Releases: Using a remote shutter release or a self-timer minimizes camera movement when capturing the shot. This eliminates the risk of blurriness caused by pressing the shutter button manually. By using a remote release, you can maintain the utmost stability and capture crisp, clear images of your mouthwatering fries.
3. Mastering Lighting Techniques
Lighting is a crucial aspect of fries photography, as it has a significant impact on the appearance and appeal of the final images. Properly manipulating light sources can make your fries look more appetizing and visually appealing. Here are some key considerations:
Significance of Lighting: Lighting not only illuminates the subject but also sets the mood and highlights the textures of the fries. It can enhance the golden color, showcase the crispy exterior, and create enticing shadows. Understanding lighting techniques allows you to control the overall atmosphere and bring out the best in your fry images.
Natural Light vs. Artificial Light: Natural light, especially diffused sunlight, is ideal for capturing the natural colors and textures of fries. Shooting near a window or in outdoor settings during the golden hours provides soft, flattering light. On the other hand, artificial light, such as continuous studio lighting or off-camera flashes, offers more control over intensity and direction. It can be used to create dramatic effects or simulate natural lighting conditions when shooting indoors.
Manipulating Light Sources: Experiment with diffusers and reflectors to modify the quality and direction of light. Diffusers soften harsh light, reducing harsh shadows and creating a more even illumination. Reflectors bounce light back onto the fries, filling in shadows and adding subtle highlights. Utilizing these tools allows you to sculpt the lighting and create the desired visual effects for your fry images.
By understanding the importance of lighting and mastering the manipulation of natural and artificial light sources, you can create stunning fry images that capture the mouthwatering appeal of this beloved snack.
4. Styling and Presentation Tips
Styling fries appropriately is crucial for creating visually appealing photographs that evoke the desired emotions in your viewers. Here’s how you can elevate your fry photography through effective styling techniques:
Importance of Styling: Styling goes beyond simply arranging fries on a plate. It helps to enhance the visual appeal and create a captivating composition that draws the viewer’s attention. The right styling can make your fries look even more appetizing and enticing.
Arranging Fries: Experiment with different arrangements to find the most visually pleasing composition. Consider the shape and length of the fries and how they interact with each other. Stagger them or create a cascading effect for a dynamic look. Play with different stacking techniques or create a pattern with alternating angles. Remember to leave negative space to balance the composition and allow the fries to stand out.
Props and Garnishes: Incorporating props and garnishes can add interest and elevate the overall aesthetic of your fry photography. Choose props that complement the theme or mood you want to convey. For example, rustic wooden boards or vibrant-colored plates can create a visually appealing backdrop. Experiment with garnishes like fresh herbs, dips, sauces, or even a sprinkle of spices to enhance the flavor and add a touch of sophistication to your composition.
Remember, the key is to strike a balance between showcasing the fries as the star of the show while adding visual interest without overwhelming the main subject.
5. Post-processing and Editing
Post-processing plays a vital role in enhancing the visual impact of your fry images and bringing out their full potential. Elevate the visual appeal of your culinary creations with our Lightroom food presets.
Here’s how you can make the most of the post-processing stage to create captivating fry photographs:
Role of Post-processing Post-processing allows you to fine-tune the exposure, colors, and overall mood of your fry images. It helps to refine the details, correct any imperfections, and create a consistent visual style.
Popular Photo Editing Software Adobe Lightroom and Photoshop are widely used by photographers for post-processing. Lightroom offers comprehensive editing capabilities, including adjusting exposure, contrast, white balance, and colors. Photoshop provides more advanced editing options, such as retouching and compositing. Both software packages enable precise control over the final look of your fry images.
Food Presets for Photoshop Capture simple fries or the essence of gourmet dishes with Food presets for Lightroom. Specifically designed for food, they elevate the allure of any meal, from rustic to refined.
Basic Editing Techniques Start by adjusting the overall exposure, ensuring that the fries are well-lit and the details are visible. Fine-tune the contrast to add depth and enhance the textures. Adjust the white balance to ensure accurate color representation. Experiment with vibrancy and saturation to make the colors pop without losing naturalness. Consider using selective editing tools to enhance specific areas, such as sharpening the edges of the fries or enhancing the background.
Remember, the goal of post-processing is to enhance the natural beauty of your fry images without going overboard. Maintain a consistent style throughout your edits to create a cohesive series of photographs.
By paying attention to styling and utilizing post-processing techniques effectively, you can take your fry photography to new heights, captivating viewers and leaving them craving a taste of those perfectly captured and mouthwatering fries.
6. Sharing and Promoting Your Fries Photography
Sharing your stunning fry photography with the world is essential to gain recognition and build a dedicated following. Here are some effective strategies to promote your work:
Social Media Platforms: Utilize popular social media platforms like Instagram, Facebook, and Pinterest to showcase your fry photography. Create a visually appealing feed and engage with the food enthusiast community. Share your images regularly, interact with your audience, and collaborate with other food-focused accounts to expand your reach.
Food Blogs and Websites: Consider creating a food blog or contributing your fry photography to established food-related websites. Write engaging blog posts that accompany your images, providing insights, recipes, or stories related to fries. Guest posting on other influential food blogs can also help increase your visibility and attract a wider audience.
Captivating Captions and Relevant Hashtags: Craft captivating captions that complement your fry images, adding context, humor, or storytelling elements. Include relevant hashtags, such as #foodphotography, #frieslover, or #foodstagram, to increase your discoverability. Research popular food photography hashtags within your niche and incorporate them strategically.
Engaging with the Food Enthusiast Community: Actively engage with fellow food enthusiasts, photographers, and food bloggers. Like, comment, and share their content, and respond to comments on your own posts. Participate in food-related challenges, collaborations, or competitions to gain exposure and foster connections within the community.
Seeking feedback and embracing constructive criticism is crucial for growth as a fries photographer. Encourage your audience to provide their thoughts and opinions on your work.
This feedback can help you improve your skills, discover new perspectives, and refine your artistic vision.
7. Creating a Signature Fry Recipe
Craft the Perfect Fry Experience
Indulge in more than just the visual feast! To truly immerse yourself in the world of fries photography, it’s time to create a signature fry recipe that complements the artistry of your images.
Here’s a mouthwatering recipe that will leave your audience craving both your photography and your delectable fries:
Ingredients:
Potatoes (choose a variety suitable for frying)
Vegetable oil for frying
Salt and pepper to taste
Optional: Seasonings or spices of your choice (e.g., garlic powder, paprika, or rosemary)
Instructions:
Wash and peel the potatoes. Cut them into uniform sticks, ensuring they are of similar thickness for even cooking.
Rinse the cut potatoes under cold water to remove excess starch. Pat them dry using a clean kitchen towel or paper towels.
Heat vegetable oil in a deep pan or fryer to approximately 350°F (175°C). Ensure there is enough oil to fully submerge the fries.
Carefully lower the potato sticks into the hot oil, frying them in small batches for about 4-5 minutes or until they turn golden brown and crispy.
Remove the fries from the oil using a slotted spoon or tongs and place them on a paper towel-lined plate to drain excess oil. Sprinkle with salt and pepper to taste.
For an extra flavor boost, toss the hot fries in your preferred seasonings or spices while they are still fresh out of the oil. Be creative and experiment with different flavor combinations!
Serve your perfectly cooked and seasoned fries in a visually appealing presentation. Arrange them in a rustic basket, sprinkle with fresh herbs, or pair them with a variety of dips and sauces.
Now, not only can you capture the essence of fries through your photography, but you can also delight your taste buds with a signature fry recipe that perfectly complements your artistic creations.
Conclusion
In conclusion, mastering the art of fries photography requires attention to detail, creative styling, and effective promotion. By understanding the importance of composition, lighting, and styling, you can create captivating fry images that leave viewers craving a taste.
Utilizing essential equipment, such as DSLR or mirrorless cameras, lenses, tripods, and remote shutter releases, will elevate the quality of your fry photography.
Post-processing and editing techniques enhance the visual impact of your fry images, ensuring they stand out. Sharing your work on social media platforms, engaging with the food enthusiast community, and seeking feedback will help promote your fry photography and build a dedicated following.
And don’t forget to take your fry photography beyond visuals by creating a signature fry recipe that complements your artistry. Craft the perfect fry experience that captures not only the eyes but also the taste buds of your audience.
With passion, creativity, and the right techniques, you can become a master of fries photography, delighting food enthusiasts with your visually stunning and mouthwatering creations.
Silvain is a French/German national and has been with the Furoore Team since the beginning. He likes to write about various photography themes, especially food photography. If you leave a comment, he will come back to you to answer any questions you may have.
Intriguing article on fries photography! As a food stylist in Brussels, I found the detailed exploration of composition, lighting, and styling techniques particularly valuable. The guidance on using natural light and the importance of post-processing resonates with my experience in food photography. Fries are indeed a challenging yet rewarding subject, and the tips on capturing their texture and color are spot on. This guide is a fantastic resource for photographers and stylists looking to elevate their food photography game, especially when it comes to making everyday items like fries look extraordinary!


Intriguing article on fries photography! As a food stylist in Brussels, I found the detailed exploration of composition, lighting, and styling techniques particularly valuable. The guidance on using natural light and the importance of post-processing resonates with my experience in food photography. Fries are indeed a challenging yet rewarding subject, and the tips on capturing their texture and color are spot on. This guide is a fantastic resource for photographers and stylists looking to elevate their food photography game, especially when it comes to making everyday items like fries look extraordinary!